


On this page you will find a detailed description of the ‘templates and sharing’ module.
Summary
Scuba diving professionals use this module to quickly create a gallery and share it with customers. Galleries can be made quickly by means of templates per dive site. Templates contain preselected pictures of marine life. The pictures within a template can be clustered into three categories: mostly seen, regularly seen and sometimes seen.
When using a template to create a gallery you select the pictures of the marine life you actually saw. Depending on the service you want to offer your customers you can also (partially) fill the dive log and leave comments. Your company banner will be integrated into the galleries you make and share.
When a gallery is shared you are actually copying it into the accounts of customers. One credit will be deducted from your credit balance for every customer you share a gallery with. Customers can complete and/or edit shared galleries within their own account. When your customers share a gallery you made for them on social media, then your company will also be promoted via your company banner in this gallery.
Have a look how a shared gallery with pictures, a banner, a dive log and comments looks like. At the bottom of this page you will find additional screenshots of this module.
- - - - -
This module consists of four elements which you can administer yourself: ‘My profile’, ‘My dive leaders’, ‘My customers’ and ‘My templates’:
My profile
You can manage your (company) profile via ‘My profile’ in the pulldown menu under your company name. Everything you register here will be visible in the company banner or in the headers of your fish (ID) cards:
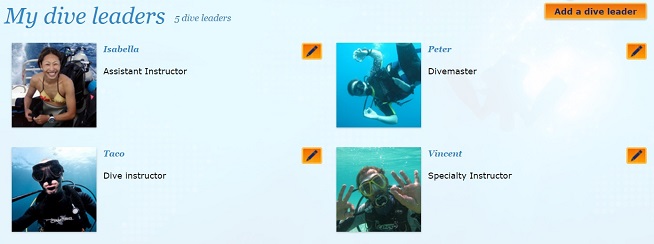
My dive leaders (screenshot below)
You can register your staff via ‘my dive leaders’ in the pulldown menu under your company name. Here you register the dive leaders who will use this module. You must upload a photo (ratio 1:1) and register a name for them. You can also add a job title and give a short description of the dive leader. All will be integrated into your company banner.
When a dive leader leaves your company you can safely remove this person from your list of dive leaders. This will have no effect on the galleries this dive leader made and shared.
My customers
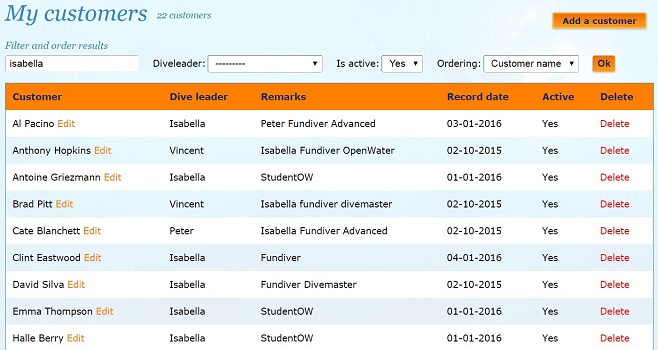
You can manage your customers via ‘My customers’ in the pulldown menu under your company name. Sharing a galley can only be done if a customer is registered in this customer database. The database is connected to your account and cannot be seen by other users.
You add a customer by using the ‘add a customer’ button. You only need to register the name and e-mail of the customer and assign the (primary) dive leader. You can also add remarks whereupon you can filter, like the name of the secondary dive leader or other words/codes you think are useful.
When the e-mail address of a customer is unknown in the MyFishGallery database, then automatically an account will be created. The customer will receive an e-mail which says that your company has created an account for him with the purpose to share galleries. In this e-mail your customer will also find his user name and password. The password can be changed on the website via ‘change password’.
In your line of business many customers will come and go. To keep your customer database up to date and organized you can search, filter and order all columns. This makes it easy to find the customers you are looking for. You can delete customers from your database when they moved on. This will not influence the customer’s account or any galleries you have shared with him. Instead of deleting a customer you can also mark him as non-active. This will separate him from the active customers and he will no longer be displayed when selecting customers to share a gallery with.
Tips and tricks
My templates
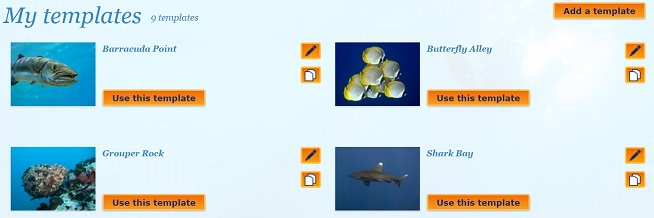
You can manage your templates via ‘My templates’ in the pulldown menu under your company name. Using templates per dive site is a fast way to create galleries, because you have already preselected the marine life pictures.
When you have created templates for all your dive sites then your dive leaders can use them to quickly create a gallery and share it with customers. A gallery with pictures can be created within a minute and it will only take a few minutes more to also fill the dive log and add comments.
The templates in the overview page are arranged alphabetically by name of dive site. Templates can also be recognized by the cover. All templates have an edit button (pencil), a copy button (double document) and a ‘Use this template’ button. At the top right of this page you will find the ‘Add a template’ button.
Create and edit a template
There are two ways to create a template. You can create it from scratch or copy an existing one and edit it.
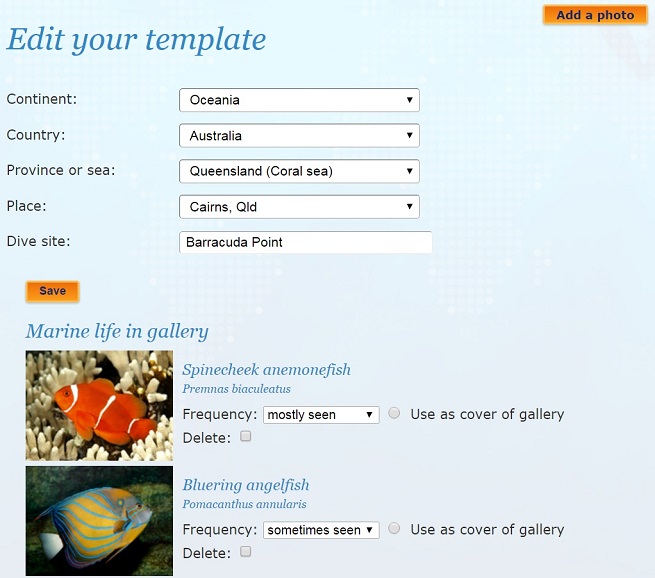
A new template will be created by clicking on the ‘Add a template’ button. You start by adding geographic information and the name of the dive site. After you save this first step, you can add marine life pictures via the ‘Add a photo’ button. This will redirect to the 'identify marine life' page. Here you search the marine animal you want to add and then you enter its picture gallery. Within this gallery you select your favorite picture and click on the ‘Add to selected template’ button. Repeat this procedure from ‘Add a photo’ for all marine animals you want to add to the template.
Pictures in a template can be clustered in three categories:
When you add pictures to a template they will get the ‘Sometimes seen’ category by default. You can change this in edit mode, via the ‘Frequency’ field behind every picture. In edit mode you can also mark the picture you want to be shown as the cover of the template in the overview page. You can delete pictures by checking the delete fields behind every picture and then tick the ‘save’ button. On the bottom right of this page you have the option to delete the complete template.
Create a gallery via a template
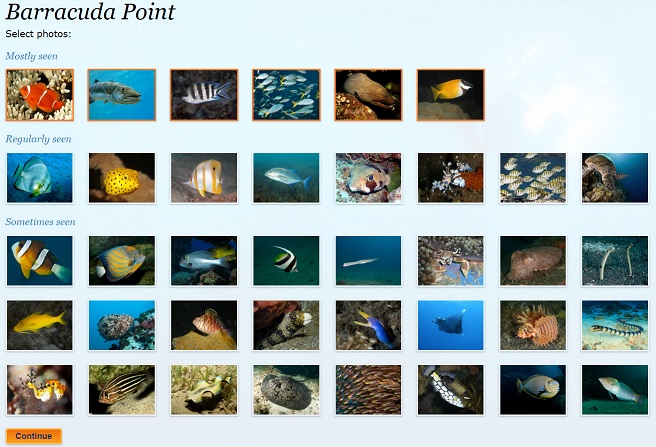
Select the template by clicking on the ‘Use this template’ button of the dive site you have been to. From the ‘mostly seen’ section, you uncheck the pictures of the marine animals you did not see. From the other sections you select the pictures of the marine animals you did see. Push the ‘Continue’ button when you are finished selecting pictures.
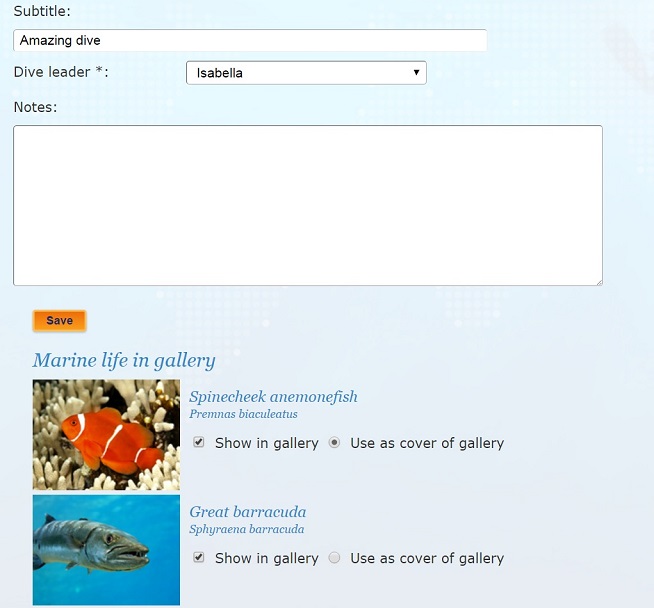
In the next screen you can a add subtitle for the gallery (option), select the dive leader (mandatory), write notes (option) and select the picture you want as the cover of this gallery (option). Push the ‘Save’ button to create the gallery. The gallery will be saved to the ‘My galleries’ overview page and will open in viewing mode.
In viewing mode you have the possibility to add more pictures to the gallery. This can be useful when a marine life animal was not available in the template you used. You do this by pushing the ‘add a photo’ button at the top of the gallery. In viewing mode you can also choose to 'add a dive log' or 'share this gallery' with you customers.
Add a dive log
After the picture gallery is created you have the choice to (partially) fill the dive log for your customers via the ‘add a dive log’ button. You can register the:
After sharing the gallery the individual customers can add:
Share a gallery
When you are satisfied with your gallery, you can share it with customers via the ‘Share this gallery’ button. You will be redirected to the customer database. The database is alphabetically sorted by name of the (primary) dive leader. You can filter divers via the ‘Dive leaders’ pulldown menu or by using the search field.
The search field is particularly useful when you have appointed filter words/codes to your customers.
Keep in mind that when you have selected the customers to whom you want to share the gallery, it is not possible to change the filter. If you do so, then the selected customers will be unchecked.
You need to select the customers with whom you want to share the gallery and then click on the ‘Share’ button at the bottom of the page. The selected customers will receive an e-mail that you have shared the gallery with them. The mail also contains a (personal) link to the gallery in the customers own account. Within the own account every customer can compete and/or edit the gallery. This will have no influence on the gallery of the dive center or the other customers.
Sharing a gallery costs one credit per share per customer. This means that one credit will be deducted from your credit balance for every customer you share a gallery with. Credits can be bought in the MyFishGallery store.
Tips and tricks
Pulldown menu for scuba diving professionals
![]()
Add, edit and delete your staff via 'My dive leaders'
Add, edit and delete customers via 'My customers'
Add, edit and copy templates via 'My templates'
Edit a template: location, dive site, frequency, cover of template and add pictures
Use a template: 1. select the pictures of the marine life you saw
Use a template: 2. subtitle, dive leader, notes and cover of gallery
Share a gallery from viewing mode (or add a photo, add a dive log or edit the gallery)
![]()
Share a gallery via the 'my galleries' overview page
![]()
Filter and select customers to share the gallery with
![]()